Adding a Table-Button to Laravel's Flux Editor
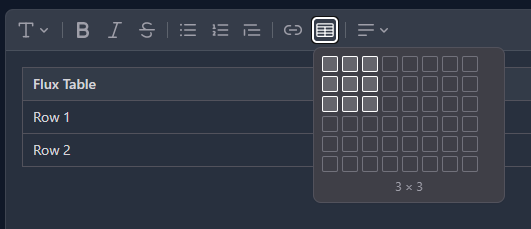
I really like Laravel and its ecosystem. In recent years, I’ve transitioned most of my frontends to Livewire, making that a lot easier, too.
When Flux UI Pro was announced, I bought the unlimited projects license, and I’ve used that in a lot of my projects since then.
Why I need this
One of these projects is my own project management tool, which I am still working on, while also using it a lot to manage both itself and plenty of other things.
One of these projects is my father’s website, which we built because he is writing books about his interesting life.
He is now collecting and digitalizing photos from this life, and I have one task about integrating these photos into his website and the books they’re related to.
I got a set of the first 16 pictures, and I created a table describing their content and the people within them.
I did that in Markdown, using Visual Studio Code. But when I then wanted to add this table to my task, I realized that the editor did not yet support tables.
So I checked if there were any articles about that and found none. At least not for the full process. There’s documentation for extending the TipTap editor and an (incomplete) GitHub issue, but that’s about it.
Installing the (correct) extension
Right from the first line, I ran into a problem:
When I ran npm install @tiptap/extension-table, I got an error. Flux’s editor still bundles TipTap v2, but the tiptap/extension-table is already at v3, so we have to pin the version to v2. The command npm install @tiptap/extension-table@^2.0 finally worked.
This may have changed whenever you’re reading this, so I’d recommend trying the current version first.
I needed all of those for it to work:
npm install @tiptap/extension-table-row@^2.0
npm install @tiptap/extension-table-header@^2.0
npm install @tiptap/extension-table-cell@^2.0
The JavaScript
The next part was registering these extensions for my Flux editor:
import Table from '@tiptap/extension-table';
import TableCell from '@tiptap/extension-table-cell';
import TableHeader from '@tiptap/extension-table-header';
import TableRow from '@tiptap/extension-table-row';
// …
document.addEventListener('flux:editor', (e) => {
   e.detail.registerExtensions([
+       Table.configure({ resizable: false }),
+       TableRow,
+       TableHeader,
+       TableCell,
 ]);

e.detail.init(({ editor }) => {
        const root = editor.options.element?.closest?.('[data-flux-editor]');

        if (root) {
            root.__editor = editor;
        }
    });
});
The second part of this is stashing the TipTap instance on the editor's root element. I already had it in place because of another feature (attachment upload), and it came in handy here as well.
Next, I added the table button to my editor toolbar:
<flux:editor wire:model="content" toolbar="heading | bold italic strike | bullet ordered blockquote | link table | align ~ undo redo" />
And I promptly got an error: Flux component [editor.table] does not exist.
The button template
Well, let’s create that then.
In resources/views/flux/editor/table.blade.php, I created this view:
<flux:dropdown class="contents">
    <flux:tooltip content="{{ __('Insert table') }}" class="contents">
        <flux:editor.button data-test="editor-table-button">
            <flux:icon.table-cells variant="outline" class="size-5!" />
        </flux:editor.button>
    </flux:tooltip>

    <flux:popover
        x-data="editorTablePicker"
        x-on:toggle="$event.newState === 'closed' && reset()"
        class="p-2"
    >
        <div class="grid w-max grid-cols-8 gap-1" x-on:mouseleave="reset()">
            <template x-for="cell in maxRows * maxCols" :key="cell">
                <button
                    type="button"
                    class="size-4 rounded-xs border"
                    :class="isSelected(cell)
                       ? 'border-accent bg-accent/20'
                       : 'border-zinc-300 hover:border-zinc-400 dark:border-zinc-500 dark:hover:border-zinc-400'"
                    x-on:mouseenter="highlight(cell)"
                    x-on:focus="highlight(cell)"
                    x-on:click="insert()"
                    :aria-label="rowOf(cell) + ' × ' + colOf(cell)"
                    :data-test="'table-size-' + rowOf(cell) + 'x' + colOf(cell)"
                ></button>
            </template>
        </div>

        <div class="pt-1.5 text-center text-xs text-zinc-500 dark:text-zinc-400">
            <span x-show="rows === 0">{{ __('Insert table') }}</span>
            <span x-show="rows > 0" x-text="rows + ' × ' + cols"></span>
        </div>
    </flux:popover>
</flux:dropdown>
That needs some more JavaScript. I added this to my app.js (now you're seeing the references to `__editor`):
/**
 * Grid-size picker behind the editor toolbar's insert-table button
 * (resources/views/flux/editor/table.blade.php).
 *
 * Cells are numbered row-major; hovering or focusing one highlights the
 * rows × cols rectangle up to it, clicking inserts a table of that size at
 * the cursor via the Tiptap instance stashed on the editor root by the
 * `flux:editor` listener above.
 */
window.Alpine.data('editorTablePicker', () => ({
    maxRows: 6,
    maxCols: 8,
    rows: 0,
    cols: 0,
    rowOf(cell) {
        return Math.ceil(cell / this.maxCols);
    },
    colOf(cell) {
        return ((cell - 1) % this.maxCols) + 1;
    },
    highlight(cell) {
        this.rows = this.rowOf(cell);
        this.cols = this.colOf(cell);
    },
    isSelected(cell) {
        return this.rowOf(cell) <= this.rows && this.colOf(cell) <= this.cols;
    },
    reset() {
        this.rows = 0;
        this.cols = 0;
    },
    insert() {
        const editor = this.$el.closest('[data-flux-editor]')?.__editor;
        console.log('insert', editor, this.$el.closest('[data-flux-editor]'));

        if (!editor || !this.rows) {
            return;
        }

        editor
            .chain()
            .focus()
            .insertTable({rows: this.rows, cols: this.cols, withHeaderRow: true})
            .run();

        this.$el.closest('[popover]')?.hidePopover();
    },
}));
Here you can see the usage of that previously mentioned reference to the editor. Like I said, not necessary, but nice to have (especially if you use it in other places as well).
The CSS
While this technically works, the table was pretty much invisible. So I added some CSS as well:
/* ---------------------------------------------------------------------------
   Tables in rich text (editor content + rendered `prose` output)
   --------------------------------------------------------------------------- */

/* Inside the Flux editor: Flux ships no table styles, so a freshly inserted
   table would be invisible. TipTap wraps the table in a `.tableWrapper` div
   (editor-view only — it is not part of the stored HTML). */
[data-flux-editor] [data-slot='content'] .tableWrapper {
    @apply my-3 overflow-x-auto;
}

[data-flux-editor] [data-slot='content'] table {
    @apply w-full border-collapse text-sm;
    table-layout: fixed;
}

[data-flux-editor] [data-slot='content'] th,
[data-flux-editor] [data-slot='content'] td {
    @apply relative border border-zinc-200 px-2.5 py-1.5 text-start align-top dark:border-zinc-600;
}

[data-flux-editor] [data-slot='content'] th {
    @apply bg-zinc-50 font-semibold dark:bg-white/5;
}

/* TipTap marks cells in a drag/shift selection with `.selectedCell`. */
[data-flux-editor] [data-slot='content'] .selectedCell::after {
    @apply pointer-events-none absolute inset-0 bg-accent/10 content-[''];
}
For rendering, I already use the “prose” class, but to make the table render the same way as it was shown in the editor, I added some styles as well:
/* Rendered rich text (the `prose` wrapper in x-rich-text): override the
   typography plugin's rules-only table look to match the editor's grid. The
   plugin styles via :where(), so these plain selectors take precedence. */
.prose table {
    @apply my-3 text-sm;
}

.prose th,
.prose td {
    @apply border border-zinc-200 px-2.5 py-1.5 text-start align-top dark:border-zinc-600;
}

.prose th {
    @apply bg-zinc-50 font-semibold dark:bg-white/5;
}

/* Cell content is wrapped in <p> by the editor — without this, the paragraph
   margins inflate every row. */
.prose th p,
.prose td p {
    @apply my-0;
}
That’s it for now. The biggest problem with this implementation is that this is a one-time insert. I can’t add or remove rows or columns for now. That’s probably something for a part two whenever I have figured that out.
Copying my text from my notes into the website, I just realized that Filament already has that button in its rich text editor, and it's using TipTap as well.
I might look into this next....
Comments